HOL 02 - Deploying a hybrid infrastructure for researchers in AWS
Info
This activity was presented during Session 8, more information on the session can be found [here](./session6-7-8.md).
Introduction
Jupyter Notebooks have become an essential tool for analyzing data and disseminating findings in data science. This hands-on lab guides you through setting up a public Jupyter Notebook server on AWS for your research team which is going to save images to an S3 bucket monitored by a Lambda that processes them and saves the final result on another bucket.
Prerequisites
- AWS Academy account. (Check out this guide for help).
- Access to the AWS Management Console.
- Knowing how to setup the AWS CLI Credentials. (Check out this guide for help).
- Basic knowledge of AWS services, including EC2, S3, Lambda, and VPC. (Check out the different sessions in the course for help).
Architecture Diagram
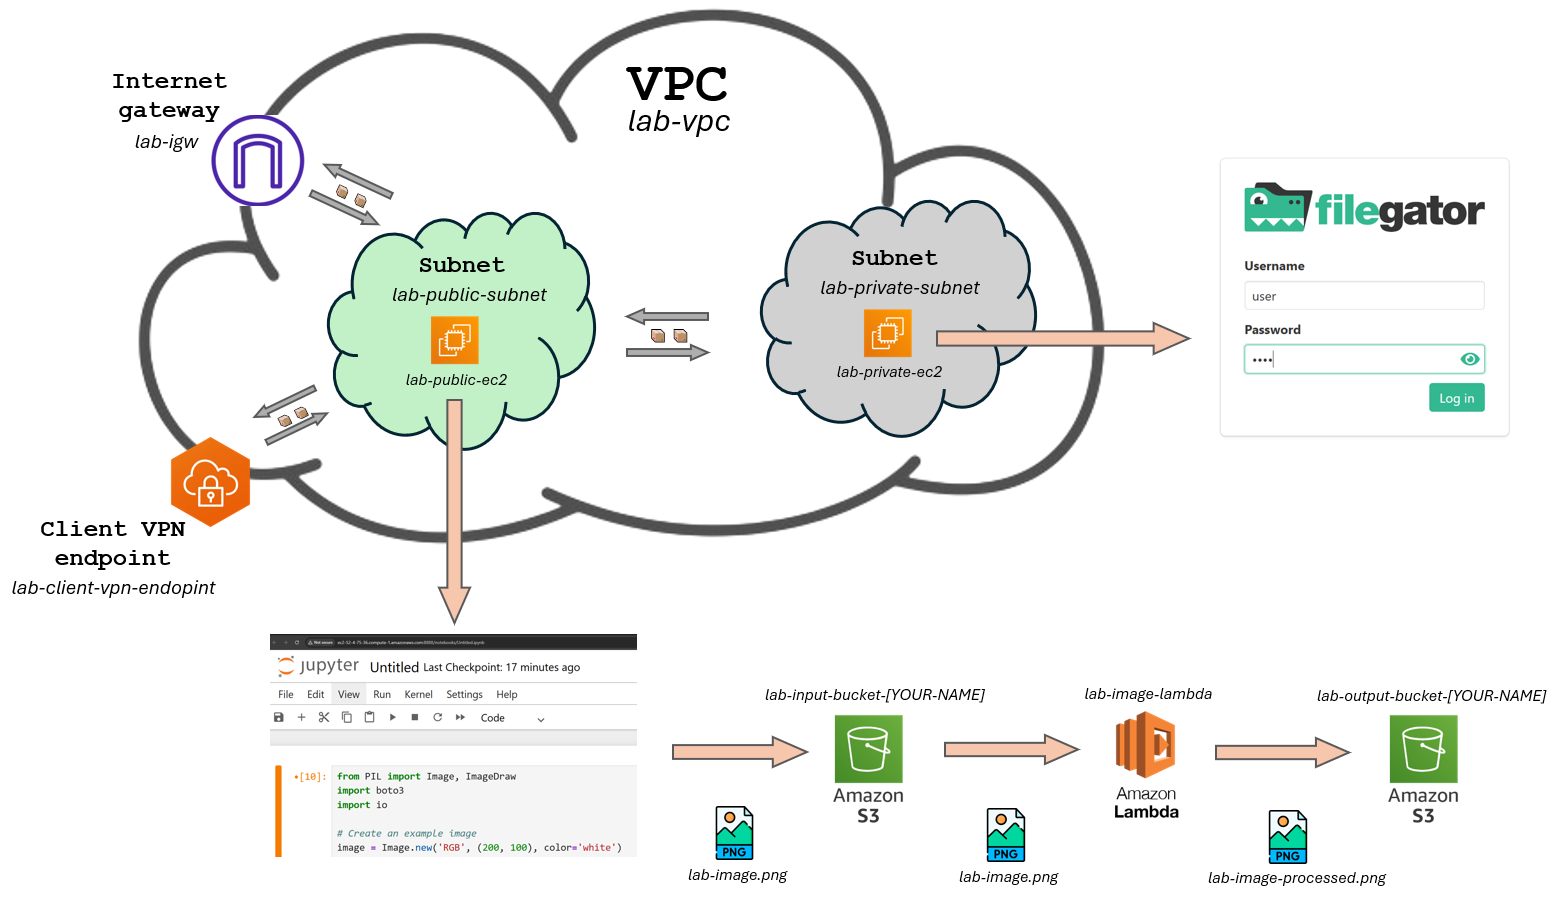
The figure below provides a visual representation of the proposed infrastructure. It depicts a Virtual Private Cloud (VPC) on AWS, segmented into two subnets: Public and Private. The Public Subnet hosts an EC2 instance named lab-public-ec2, which is Internet-accessible. The Private Subnet accommodates an EC2 instance named lab-private-ec2, accessible via VPN. The VPC also contains a Client VPN endpoint, which allows us to simulate we are on the public subnet and makes it possible to access resources on the private subnet.
The public EC2 instance will be interacting with an S3 bucket using boto3 library for python which is going to trigger a Lambda. The idea is to run a piece of Python code on a Jupyter Notebook that generates an example image and uploads it to the input S3 bucket, then a lambda is triggered and saves that image to the output bucket with a different name.
The private EC2 instance will just be serving the file server and will need to temporarily have internet access to install the required software by using a NAT Gateway. The VPN endpoint will be used both to connect to the private EC2 instance by SSH and configure the file server, and once the file server is up and running, to access it through the browser on our local machine.
Task
This task's goal is to set up the infrastructure for the public Jupyter Notebook server, the S3 buckets and the Lambda function. Below is the order in which I would recommend to proceed:
- Create the VPC and the public subnet.
- Add the Internet Gateway to the VPC and attach it to the public subnet.
- Create a Route Table for the public subnet and associate it with the Internet Gateway.
- Create an EC2 instance in the public subnet and configure the security group to allow SSH (port 22) and HTTP access on port 8888.
- Connect to the EC2 instance through SSH, setup python (whichever version you want) and install the required libraries (
boto3,jupyter,pillow). - Create the S3 buckets and the Lambda function. Configure the Lambda function to trigger when a new image is uploaded to the input bucket and the code (which I will provide below) to make it process the image and upload it to the output bucket.
- Configure AWS CLI Credentials on the EC2 instance, launch the Jupyter Notebook server and run the code (which I will provide below) to upload the image to the input bucket.
- Check if the Lambda function is triggered and the image is processed and uploaded to the output bucket.
Services
Here are the services you will need to create in the AWS Management Console:
Info
The list below **does not** contain all the parameters you need to fill in, just the ones that could vary from what we saw in class. You'll need to find out the rest of the parameters by yourself (just look at the slides, everything is there 😉)
For this HOL I would recommend to visit Session 3, Session 4 and Session 5 of the course.
-
VPC:
- Name: lab-vpc
- CIDR: 10.0.0.0/16
-
Subnets:
- Name: lab-public-subnet
- CIDR: 10.0.1.0/24
- Name: lab-public-subnet
-
Internet Gateway:
- Name: lab-igw
-
Route Table:
- Name: lab-public-to-internet
- Association: lab-public-subnet
- Routes: 0.0.0.0/0 -> lab-igw
-
EC2 Instances:
- Name: lab-public-ec2
- Subnet: lab-public-subnet
- AMI: Amazon Linux 1 # TODO Check if it is 2 or 1 by default
- Name: lab-public-ec2
-
S3 Buckets:
- Name: lab-input-bucket-[YOUR-NAME]
- Name: lab-output-bucket-[YOUR-NAME]
-
Lambda Function:
- Name: lab-lambda-function
- Runtime: Python 3.14
Additional resources
Below are the code snippets you will need for the first task, remember to replace the bucket names with your own.
Here is the python code to use for the Lambda function:
import boto3
import json
import os
import urllib.parse

s3 = boto3.client('s3')

def lambda_handler(event, context):
    # Extract bucket and image info from the S3 event
    bucket = event['Records'][0]['s3']['bucket']['name']
    key = urllib.parse.unquote_plus(event['Records'][0]['s3']['object']['key'])
    original_name = os.path.splitext(os.path.basename(key))[0]
    download_path = f'/tmp/{os.path.basename(key)}'
    s3.download_file(bucket, key, download_path)

    # Upload it to the "output" bucket with a different name
    result_image_name = f"{original_name}-processed.png"
    result_bucket = 'lab-output-bucket-[YOUR-NAME]' # Replace with your bucket name
    s3.upload_file(download_path, result_bucket, result_image_name)

    return {
        'statusCode': 200,
        'body': json.dumps(f"Processed {key}")
    }
And here is the python code to use for the Jupyter Notebook:
from PIL import Image, ImageDraw
import boto3
import io

# Create an example image
image = Image.new('RGB', (200, 100), color='white')
draw = ImageDraw.Draw(image)
draw.text((50, 40), "Hello!", fill='black')
buffer = io.BytesIO()
image.save(buffer, format='PNG')
buffer.seek(0)

# Upload to S3
bucket_name = 'lab-input-bucket-[YOUR-NAME]'   # <-- Replace with your bucket name

s3 = boto3.client('s3')
object_key = 'lab-image.png'
s3.upload_fileobj(buffer, bucket_name, object_key)

print(f"Image uploaded to s3://{bucket_name}/{object_key}")
Deliverable
- A PDF report to be submitted to francesc.solsona@udl.cat. The report should just contain screenshots that demonstrate each of the task steps defined above. Screenshots can be accompanied by a short description of what is being shown and any other relevant information.
Minimum requirements
The minimum requirements to pass (get 5/10 points) the assignment are:
-
The public EC2 instance is up and running, with the Jupyter Notebook server running.
-
The input S3 bucket is created and running the provided python code on the Jupyter Notebook server uploads an image to the input bucket.